 Pin it
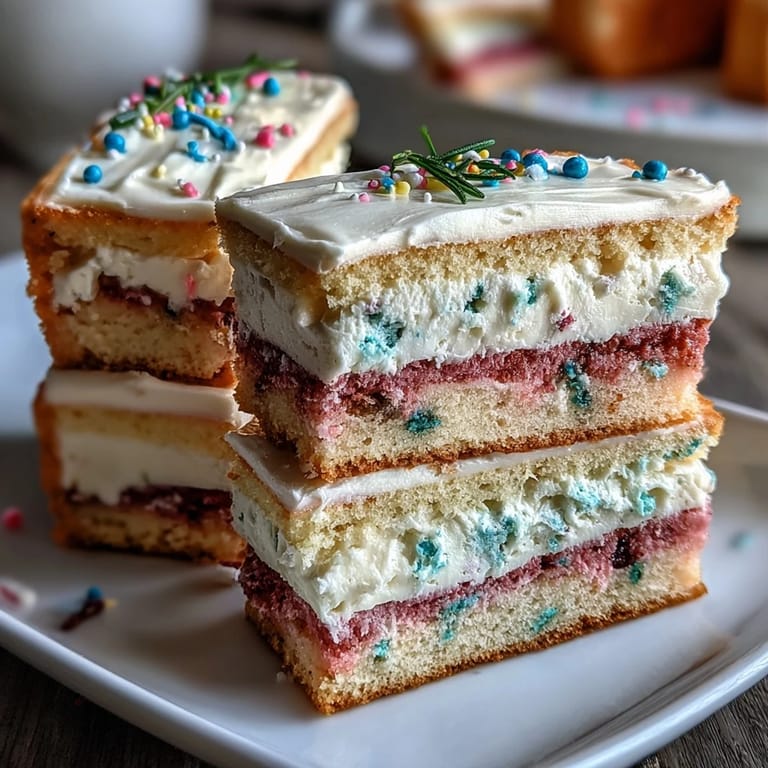
 There's something about pastel colors that makes you want to bake without overthinking it. I stumbled onto this ombre cake while reorganizing my kitchen one rainy afternoon, surrounded by gel food coloring bottles I'd collected over years of experimenting. The idea of creating soft gradient layers felt less like following instructions and more like painting with cake batter, which appealed to the part of me that wanted to make something beautiful without pretending to be a professional baker. Spring was arriving, and everything felt like it deserved a little more color.
My neighbor stopped by while I was piping the final frosting swirls, and I almost didn't let her see the cake. There's this moment when you're still fixing little imperfections, convinced everything is slightly off, but when someone else's eyes light up, you realize you were being too hard on yourself. She asked if I'd made it for a special occasion, and the truth was simpler: I just wanted to bake something that made me happy to look at while eating it.
Ingredients
- All-purpose flour (3 cups): The backbone of a tender crumb, and using room-temperature ingredients means this flour distributes evenly without overdeveloping gluten.
- Baking powder (2 ½ tsp): This lift is subtle but essential; too much and your cake tastes metallic, too little and you're left with a dense disappointment.
- Unsalted butter (1 cup for cake, 1 ½ cups for frosting): Room temperature is non-negotiable here because cold butter won't cream properly, and that creaming step is where the tender texture comes from.
- Granulated sugar (2 cups): This sweetens and aerates as you beat it with butter, creating those tiny air pockets that make the cake light.
- Eggs (4 large): Room temperature eggs emulsify smoothly into the butter mixture without seizing or creating lumps.
- Pure vanilla extract (1 tbsp for cake, 2 tsp for frosting): The pure stuff costs more but tastes cleaner; imitation extract can taste slightly chemical when it's the main flavor.
- Whole milk (1 cup): At room temperature, it combines seamlessly with the batter without temperature shock.
- Gel food coloring (pink and yellow): Gel colors are less watery than liquid food coloring, so you get true pastel shades without diluting your batter or frosting.
- Powdered sugar (5 cups, sifted): Sifting breaks up lumps that can hide in unsifted sugar, and sifting keeps your frosting silky.
- Heavy cream or milk (3–4 tbsp): A touch of liquid loosens the frosting to perfect spreading consistency without making it greasy.
- Salt (pinch for frosting, ½ tsp for cake): Salt is a flavor amplifier that makes vanilla taste more like vanilla and rounds out sweetness.
Tired of Takeout? 🥡
Get 10 meals you can make faster than delivery arrives. Seriously.
One email. No spam. Unsubscribe anytime.
Instructions
- Set up your baking station:
- Preheat your oven to 350°F and prepare three 8-inch round pans by greasing them and lining the bottoms with parchment paper, which guarantees your layers slip out cleanly. This step takes two minutes and saves you an hour of cake frustration.
- Combine your dry ingredients:
- Whisk flour, baking powder, and salt together in a medium bowl, and don't skip this step because it distributes the leavening evenly throughout the batter. When you whisk by hand instead of just stirring, you aerate the flour slightly and catch any lumps in the baking powder.
- Cream butter and sugar:
- Beat room-temperature butter and sugar together on medium speed for about 3 to 4 minutes until the mixture turns pale and fluffy, which means air is being incorporated. The longer you cream, the lighter your final cake texture will be, but don't go longer than 5 minutes or you risk deflating the mixture.
- Incorporate eggs one at a time:
- Add each egg individually and beat well after each addition, which prevents the mixture from looking broken or curdled. This gradual approach helps the eggs emulsify smoothly into the butter, creating a stable base for your batter.
- Add vanilla and alternate wet and dry:
- Mix in vanilla, then add the flour mixture and milk alternately, starting and ending with flour, mixing just until combined. Overmixing at this stage develops gluten and creates a tough, dense cake, so stop as soon as the streaks of flour disappear.
- Divide and tint your batter:
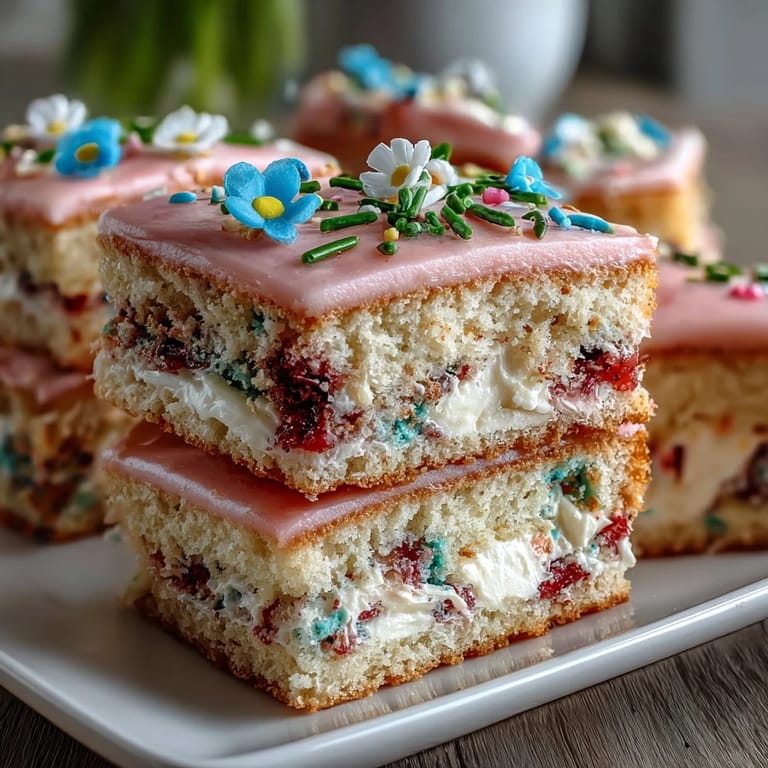
- Split the batter into three equal bowls and tint one with a tiny drop of pink gel coloring for pale pink, one with a drop of yellow for soft yellow, and leave the third plain or add one drop of each for a gentle peach. Start with less coloring than you think you need because gel colors are concentrated and you can always add more.
- Pour, smooth, and bake:
- Pour each colored batter into its prepared pan, smooth the tops with a spatula so they bake evenly, and slide them into the oven for 22 to 26 minutes. Your cakes are done when a toothpick inserted in the center comes out clean with maybe a crumb or two.
- Cool with patience:
- Let the cakes cool in their pans for exactly 10 minutes, then turn them out onto wire racks to cool completely, which prevents them from breaking while warm. Rushing this step means you'll end up with crumbly layers that fall apart during frosting.
- Prepare your frosting:
- Beat room-temperature butter until creamy, gradually add sifted powdered sugar with vanilla and salt, and drizzle in milk to reach fluffy spreading consistency. If your frosting feels stiff, add milk one tablespoon at a time, but if it gets too soft, refrigerate it for 15 minutes to firm up.
- Tint your frosting layers:
- Divide the frosting into three bowls and tint one pastel pink, one pastel yellow, and leave one plain, matching the colors of your cake layers. The frosting colors can be slightly darker than your cake colors since you're applying them as a spread.
- Assemble with intention:
- Place the yellow cake layer on your serving plate, spread a thin layer of yellow frosting on top, then add your peach or plain layer with plain frosting, and finish with the pink layer crowned with pink frosting. Leveling each cake layer with a serrated knife beforehand creates flatter surfaces that stack evenly.
- Create your ombre effect:
- Use your remaining frosting to frost the sides of the cake, blending from yellow at the base to pink at the top by layering and smoothing with an offset spatula or cake scraper. The blending doesn't need to be perfect because the ombre effect is forgiving and any streaks just add depth.
- Add finishing touches:
- Decorate with pastel sprinkles, edible flowers, or your favorite cake toppers, then refrigerate for at least 30 minutes before slicing. A chilled cake slices much cleaner than one at room temperature.
 Pin it
 My sister's daughter turned seven that spring, and I made this cake without telling anyone it was coming. When I walked into the party with those soft gradient layers visible through my cake carrier, her whole face changed—not because it was fancy, but because it was made with intention just for her. That's when I realized the real beauty of this cake isn't the ombre effect at all, but the fact that it gives you an excuse to spend an afternoon making something that makes someone else feel special.
The Science of Pastels
Gel coloring works differently than liquid food coloring because the pigment is suspended in a thick base rather than diluted in water. When you use liquid coloring, you're essentially adding extra moisture to your batter or frosting, which changes the recipe's ratio and can make cakes dense or frostings grainy. I learned this the hard way after my first attempt turned my beautiful cake into something closer to a hockey puck. Now I always keep gel colors stocked, and the difference in the final result is immediate and undeniable.
The Art of Leveling
The first time I tried to stack these layers without leveling them, they slid around like they were on ice, and I ended up with a slightly tipsy-looking cake that tasted perfect but looked chaotic. A serrated knife and a gentle sawing motion takes off just enough from the domed top of each layer to create a flat surface that stacks securely. You don't need fancy cake leveling tools for this, just patience and a steady hand, and knowing this one trick changed how stable my layered cakes feel.
Storage and Timing Tricks
This cake actually improves slightly after a day because the crumb sets and the frosting becomes more stable, so baking it the day before your gathering is genuinely the smarter move. Room temperature storage works for a day, but after that, refrigeration keeps the frosting from softening in warm weather and extends the cake's life to four days. A few last-minute thoughts that'll save you trouble:
- Slice with a hot, wet knife wiped clean between cuts for edges that are sharp instead of crumbly.
- If your frosting separates or looks grainy, you've either overmixed it or your butter was too warm, so chill it and beat it again gently.
- Edible flowers and pastel sprinkles are optional, but they genuinely make the presentation feel intentional and finished.
 Pin it
 This cake taught me that baking doesn't have to be intimidating to be impressive, and sometimes the most beautiful moments in the kitchen come from giving yourself permission to play with color and texture. Every time I make it, someone asks how long it took me to learn this technique, and I get to tell them the truth: not long at all, just a little attention and faith in the process.
Recipe FAQs
- → How do I achieve the pastel ombre effect?
Divide the batter into three portions and tint each with pink, yellow, or leave plain. Layer these colors before baking for a soft gradient.
- → What frosting complements this cake?
Use buttercream tinted in matching pastel shades to enhance the layered ombre look and add creamy richness.
- → Can I prepare the layers in advance?
Yes, bake the layers ahead and cool completely. Wrap and refrigerate until ready to assemble and frost.
- → What tools are best for smooth frosting application?
An offset spatula and cake scraper help achieve clean, blended edges and an even finish.
- → How should the cake be stored?
Store covered at room temperature for one day or refrigerate up to four days to maintain freshness.