 Pin it
 There's something almost magical about watching egg whites transform into clouds of meringue—I discovered this while helping my aunt prepare for a garden party years ago, and she let me taste the raw mixture straight from the bowl before scolding me gently about food safety. Now whenever I make these delicate pavlovas, I think of her kitchen flooded with afternoon light, the mixer humming steadily while we chatted about everything and nothing. These crisp, tender nests have become my go-to when I want to impress without spending hours in the kitchen, and they never fail to make people pause mid-conversation when they bite into that perfect contrast of crunch and cream.
I made these for my daughter's eighth birthday tea party last spring, and watching her friends' faces light up as they bit into the cream-filled centers was worth every careful minute of preparation. One guest asked if I'd bought them from a fancy bakery, and my daughter proudly announced that her mum had made them, which somehow made the whole afternoon feel less about the dessert and more about the moment we were sharing together.
Ingredients
- Egg whites: Room temperature is non-negotiable here—cold eggs won't whip properly, so let them sit on the counter for 20 minutes while you prep everything else.
- Superfine sugar: This dissolves completely into the meringue, creating that glossy, smooth finish; regular sugar leaves a grainy texture that betrays you.
- Cornstarch: The secret ingredient that keeps pavlovas from weeping; it absorbs moisture and prevents that wet, sticky bottom.
- White vinegar: Stabilizes the meringue and adds a subtle tang that balances the sweetness beautifully.
- Vanilla extract: Use real vanilla if you can; it perfumes the entire kitchen and tastes noticeably different.
- Heavy whipping cream: Cold cream whips faster and holds its shape longer, so chill your bowl and beaters too.
- Fresh strawberries: Choose ones that smell sweet and feel slightly soft; they should macerate just enough to release their juices without falling apart.
Tired of Takeout? 🥡
Get 10 meals you can make faster than delivery arrives. Seriously.
One email. No spam. Unsubscribe anytime.
Instructions
- Set your stage:
- Preheat the oven to 250°F (120°C) and line your baking sheet with parchment paper. Make sure everything is clean and dry—even a speck of grease will sabotage the egg whites.
- Whip the whites:
- Beat room-temperature egg whites on medium speed until soft peaks form, which takes about two minutes. The mixture should look foamy and pale, and when you lift the beaters, a peak should gently fold back on itself.
- Add sugar gradually:
- This is where patience pays off. Add sugar one tablespoon at a time, beating constantly between additions, until you have stiff, glossy peaks that stand up straight. This takes longer than you'd expect, usually five to seven minutes total, but rushing creates grainy meringue.
- Fold in the magic:
- Gently fold in cornstarch, vinegar, and vanilla using a spatula, being careful not to deflate all that air you've worked so hard to incorporate. The mixture should feel silky and look almost shiny.
- Shape your nests:
- Spoon or pipe the meringue into six small nests on your prepared baking sheet, creating a slight indentation in the center of each with the back of a spoon. They should look like little edible bowls waiting to be filled.
- Bake low and slow:
- Bake for one hour at the low temperature—this gentle heat dries them out rather than browning them, creating that signature crispy exterior. After the time is up, turn off the oven and crack the door open about two inches, then let them cool completely inside, which takes another hour.
- Prepare the berries:
- While the meringues cool, toss your sliced strawberries with granulated sugar and lemon juice, then let them sit for 15 minutes. The sugar draws out the juices and creates a light syrup that's pure strawberry flavor.
- Whip the cream:
- Pour cold heavy cream into a chilled bowl and whip with cold beaters until soft peaks form, adding powdered sugar and vanilla extract partway through. Stop as soon as you see soft peaks—overbeating turns it into butter, which we've all learned the hard way.
- Bring it together:
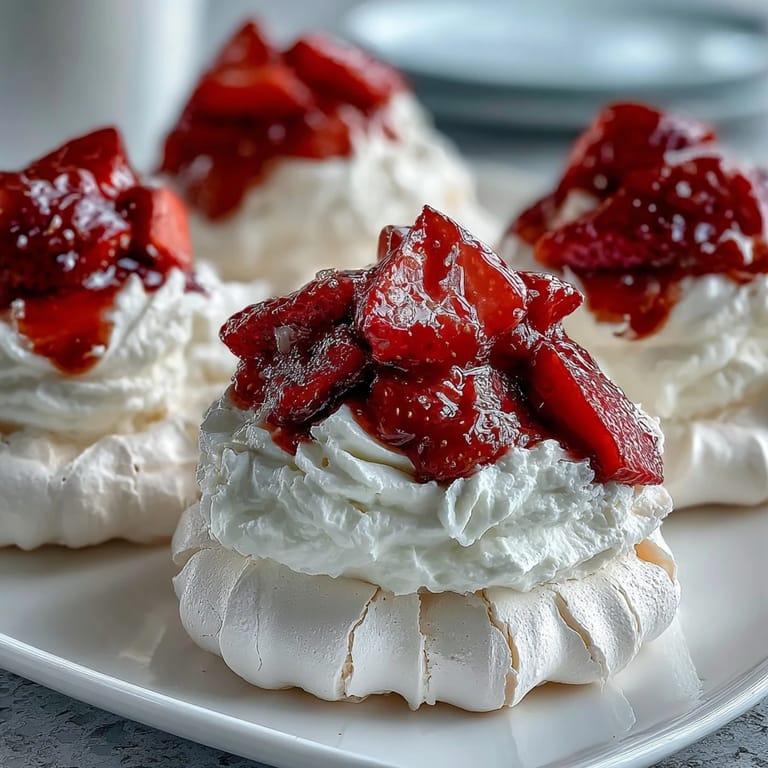
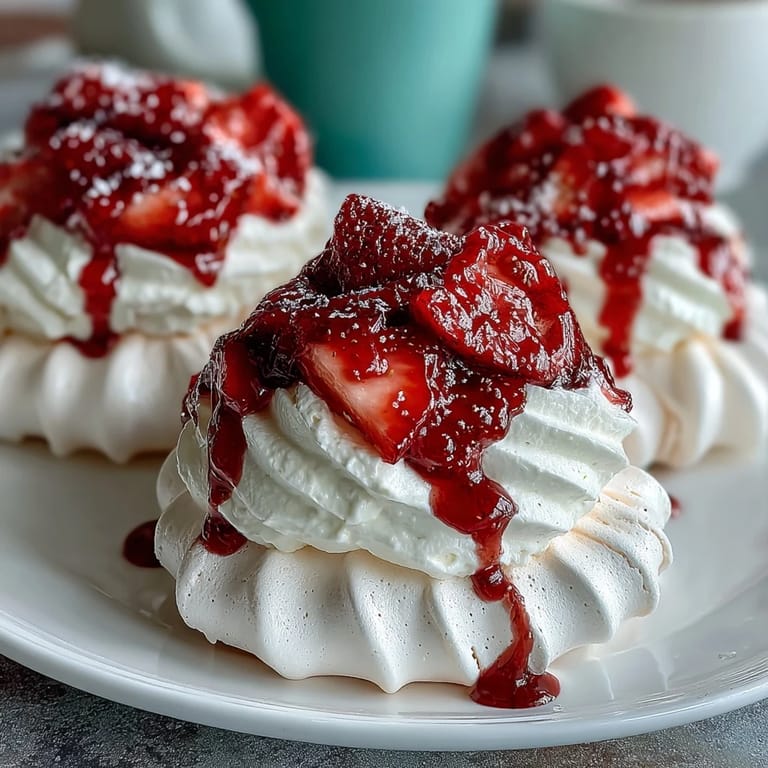
- Place each cooled meringue on a serving plate, dollop the whipped cream into the center, and top generously with macerated strawberries and their juices. Serve immediately while the meringue is still crisp and the cream is still billowy.
 Pin it
 There was a moment at that birthday party when everything clicked into place—the meringues were perfectly crisp, the cream was just the right pillowy texture, and the strawberries glistened with their own sweet juices. My daughter took a bite and closed her eyes, and I realized that sometimes the best kitchen victories aren't about technique or timing, but about creating something delicate and beautiful that brings genuine joy to the people you're feeding.
Why These Feel Special
Pavlovas straddle this beautiful line between seeming impossibly fancy and actually being quite forgiving once you understand their quirks. They're named after a Russian prima ballerina, and there's something romantic about that—the way they're delicate and sculptural, yet sturdy enough to hold up through a meal. I've served them at casual Tuesday dinners and fancy Saturday celebrations, and they always feel like you've made an effort without making a fuss.
Building Flavor Layers
The vanilla in the meringue gives it a subtle warmth that plays beautifully against the tartness of the lemon juice in the strawberries. The white vinegar adds something most people can't quite identify but that makes them say the dessert tastes more like itself, if that makes sense. I've tried skipping it to save steps, and every time I've regretted it—the payoff for that tiny extra ingredient is absolutely worth it.
Making Them Ahead
One of my favorite things about pavlovas is that you can make the meringue shells up to two days in advance, storing them in an airtight container at room temperature. This means you're really just whipping cream and slicing berries when guests arrive, which transforms an elaborate-sounding dessert into something genuinely manageable. I once made the shells on a quiet Thursday morning, then assembled them just before a Friday dinner party, and the whole thing felt effortless.
- Keep meringues away from humid kitchen air after baking by storing them with a silica gel packet if you have one.
- If they do soften slightly from humidity, pop them back in a 200°F oven for 10 minutes to re-crisp them.
- Assemble no more than 30 minutes before serving to keep the meringue as crisp as possible.
 Pin it
 These little pavlovas remind me why I love cooking—because it's not really about the dessert itself, but about the quiet satisfaction of creating something beautiful with your hands and the joy of watching someone you care about enjoy it. They're proof that sometimes the most elegant things are also the most achievable.
Recipe FAQs
- → How do I achieve the perfect meringue texture?
Beat egg whites until soft peaks form, then add sugar gradually until stiff, glossy peaks develop. This ensures the meringue will be crisp outside and soft inside.
- → Can I use other fruits instead of strawberries?
Yes, fresh berries like raspberries or blueberries can be substituted or mixed for a varied flavor and color profile.
- → Why is vinegar added to the meringue?
Vinegar helps stabilize the egg whites, improving volume and texture during baking.
- → What is the best way to store mini pavlovas before serving?
Store baked meringue nests in an airtight container at room temperature to keep them crisp. Assemble with cream and fruit just before serving.
- → How long can the cream topping be prepared in advance?
Whipped cream is best used immediately but can be prepared a few hours ahead and kept chilled to maintain texture.