 Pin it
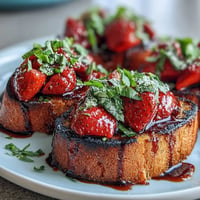
 My first bite of saganaki happened at a tiny taverna in Athens, where an elderly woman slid a golden square of crispy cheese onto my plate with the confidence of someone who'd done it ten thousand times. She squeezed lemon over it without asking, and the sizzle it made on the hot cheese felt like a small celebration happening right in front of me. That moment taught me that the best appetizers aren't complicated—they're just honest ingredients treated with respect and speed. Now whenever I make saganaki at home, I chase that same feeling: the urgency of serving it immediately, the way the outside shatters when you bite down, and that perfect balance of salt and citrus that makes you want another piece before you've finished the first.
I made saganaki for a dinner party where I'd somewhat overcommitted on ambition, and honestly, it saved me. While the main course demanded attention, I had these little golden treasures keeping warm on a plate, ready to emerge whenever someone needed feeding. A guest asked for the recipe on the spot, and I realized then that simplicity executed well has its own kind of magic.
Ingredients
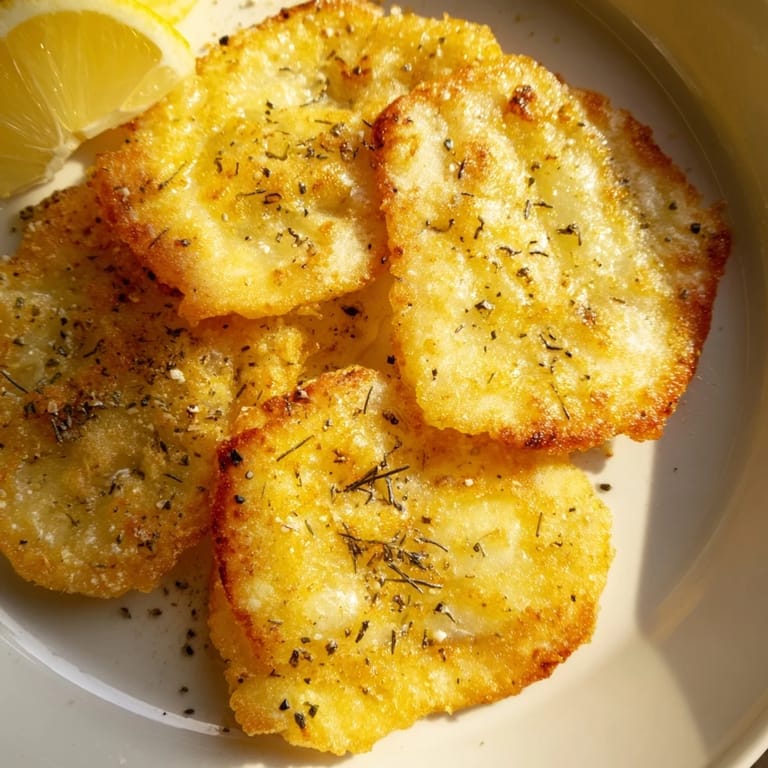
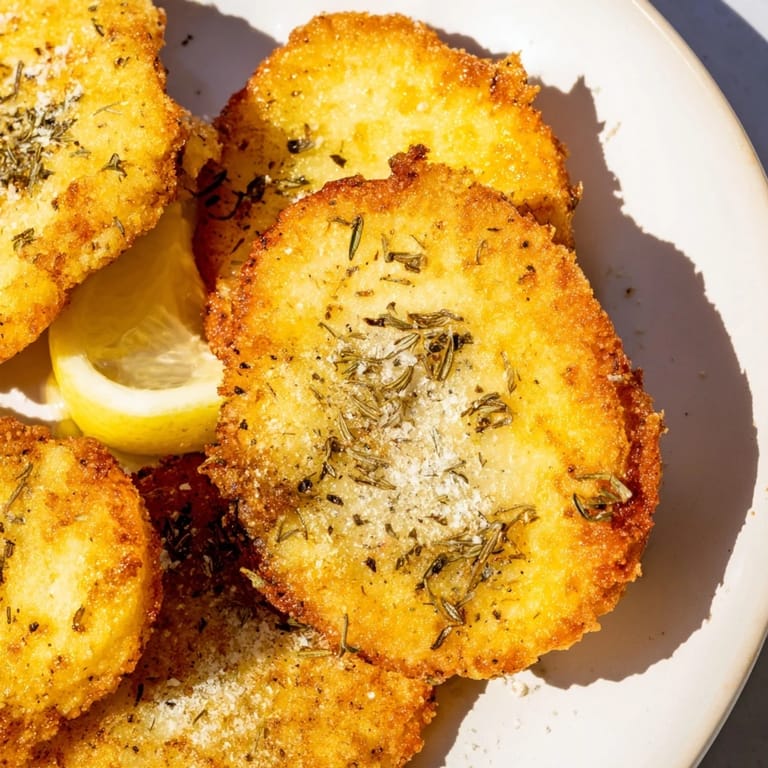
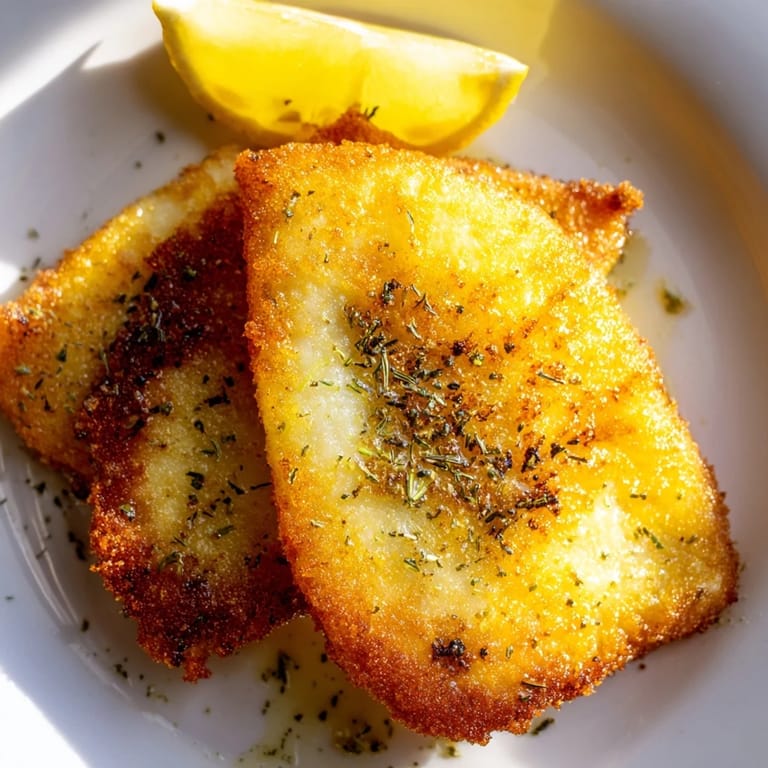
- Firm Greek cheese (kasseri, kefalotyri, or halloumi), 200 g: Slice into 1 cm pieces—this thickness is essential because it gives you that window where the outside crisps while the inside stays gooey.
- All-purpose or gluten-free flour, 2 tbsp: Just enough to create a delicate crust; too much flour makes it thick and heavy instead of delicately crisp.
- Olive oil, 2 tbsp: Use a good one here—it's one of only a handful of ingredients, so quality matters.
- Lemon, 1 whole: Cut into wedges; the acid is what transforms warm cheese from rich to balanced and craveable.
- Dried oregano, 1/2 tsp: A whisper of it, just enough to hint at the Mediterranean without overpowering the cheese.
- Freshly ground black pepper: Finish with this—it adds a tiny sharp note that keeps everything from feeling one-dimensional.
Tired of Takeout? 🥡
Get 10 meals you can make faster than delivery arrives. Seriously.
One email. No spam. Unsubscribe anytime.
Instructions
- Dry your cheese thoroughly:
- Pat each slice with paper towels until they feel completely dry to the touch. Any moisture on the surface will steam instead of fry, and you'll lose that golden crust.
- Coat lightly in flour:
- Dredge each piece, then immediately shake off the excess over the plate. You want a whisper of flour, not a thick coating that'll turn gummy.
- Get your oil hot and ready:
- Heat it in a non-stick skillet over medium-high heat until it shimmers and moves easily around the pan. This should take about a minute; you'll know it's ready when a tiny piece of flour sizzles immediately.
- Fry quickly, watching closely:
- Place cheese slices in the hot oil and fry for 1–2 minutes per side until golden and crisp on both surfaces. The whole process happens fast—don't step away.
- Drain and serve immediately:
- Remove to paper towels for just a minute, then transfer to your serving plate. Sprinkle with oregano and pepper, and bring it to the table while it's still warm and the outside still has that satisfying crunch.
 Pin it
 There's something wonderful about watching people's faces light up the moment they bite into saganaki and that contrast hits—the shatter of the crust, the ooze of warmth inside, the bright shock of lemon. It's such a small thing, but it feels celebratory in a way that fancy dishes sometimes miss.
Choosing Your Cheese
Kasseri and kefalotyri are the traditional choices, and they're wonderful, but don't stress if you can't find them. Halloumi works beautifully because its high melting point means it holds together perfectly while frying. Graviera is another solid option if you spot it. What matters most is that your cheese is firm enough to slice cleanly and has enough body to stay intact during cooking—soft cheeses will turn into puddles, which is honestly a different and messier experience.
The Gluten-Free Path
Simply swap regular flour for gluten-free flour, and everything works exactly the same way. The coating crisps up identically, and honestly, most people won't notice the difference. I've served both versions side by side and gotten compliments on both.
Building the Moment
Saganaki shines as part of a mezze platter, shared with crusty bread, olives, and good wine. It's also a showstopper appetizer at dinner parties because it's fast enough that you can fry the batches to order, serving them hot to each guest. Pair it with a crisp white wine like Assyrtiko if you can find it, or any bright, acidic white that won't clash with the lemon and salt.
- Make sure all your ingredients and tools are ready before you start frying—there's no time to hunt for the lemon once the cheese hits the oil.
- If you're cooking for a crowd, fry in batches of 3–4 pieces so the oil temperature stays steady.
- Set a timer for the first side; the second side usually cooks a tiny bit faster, so stay close and watch for that golden color.
 Pin it
 Saganaki reminds me that some of the most memorable food doesn't come from lengthy recipes or rare ingredients—it comes from respecting simplicity and timing. Make it when you want to impress without stress, or make it for yourself on a quiet evening with just a lemon and good cheese.
Recipe FAQs
- → What type of cheese works best for Saganaki?
Firm Greek cheeses like kasseri, kefalotyri, halloumi, or graviera hold up well when fried, offering a crispy exterior and melty interior.
- → Can I make this dish gluten-free?
Yes, substituting all-purpose flour with gluten-free flour ensures it's safe for gluten-sensitive diets.
- → How do I achieve the perfect crispy texture?
Lightly dust cheese slices in flour and fry in hot olive oil until golden on each side, about 1–2 minutes per side.
- → What is the purpose of the lemon wedge?
Squeezing fresh lemon over the hot cheese adds bright acidity, enhancing the rich, savory flavors.
- → What are good serving suggestions for Saganaki?
Serve hot with a sprinkle of oregano and black pepper, alongside crusty bread or as part of a mezze spread with white wine.
- → Can I prepare Saganaki ahead of time?
It’s best served immediately after frying to enjoy the crispy texture and warm cheese.